Summer Project
October 10, 2017


Visual trends are powerful imageries and trends that shape our year. Visuals have become the language of the 21st Century. Getty images do a creative research each year to understand what people are interested to see and this helps many businesses to promote themselves through imagery which can attract the audience’s attention.
The six Visual Trends which defined 2017 are:
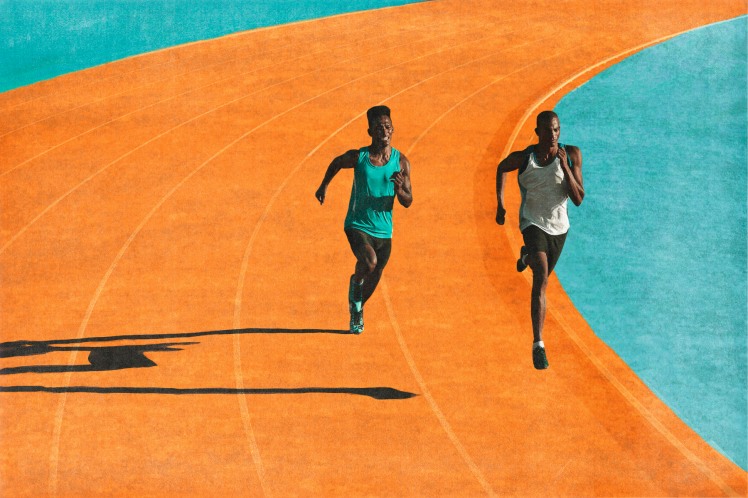
1) VIRTUALITY

This trend came out from a previous trend as it started with the concept of social media and technology. However, it has developed into a Virtual Reality. Lately, most of the pictures are no more normal landscapes or action portrait but a new 360 imagery. Thanks to GoPros, VRs and other advanced technologies people are able to take pictures instantly in the middle of an activity. For example when doing sports like surfing, riding a bike or having fun on a roller coaster. This allows the viewer to immerse himself in the scene and this also has the power to incite and inspire action.
I find this trend really interesting and fun but I don’t think I will choose this trend to work on.
Lauren Catten states: “[…] digitally speaking, we can now go anywhere without our feet leaving the floor”
2) COLOUR SURGE

This trend is all about colours, the colour has become the star of the image and no more just one component. It’s about breaking the rules by using colour in ways we’ve never used before, either contrasting or complementing different colours. This trend is really appealing to everyone because of the presence of bright and bold colours many have created strong visuals. As we know unusual colour combinations immediately triggers excitement and interest that’s why many companies, stylist and campaigns have used this trend to advertise or promote themselves. For example stylists like Alexander McQueen who usually uses dark, vintage colours for his clothes started embracing bold primary colours.
“In our hyper-kinetic world, audiences are fatigued with the ordinary”.
I am intrigued by this trend and will explore it more in detail, although I know working with colour isn’t my strongest point.
3) UNFILTERED

This trend was tracked by Getty since 2004 in various forms since 2004, the most recent one was last years trend “Outsider In”. Which was a trend that was about rebellion and unique visuals which are often considered to be unsual. This trend has evolved into the unfiltered trend but it takes a step further. It has become a new way in commercial photography to document powerful stories. It’s honest direct and real and because our todays’s society is lacking of genuine authenticy with the mass marketing this trend has got people’s attention.
4) GRITTY WOMAN

This trend is about a new way of portraying women in the media not as object and not to be underestimated. Gritty women are tenacious, they are not to be crossed nor overlooked. This trend was identified for the past five years through Female Rising, Genderblend and Messthesthics. The trend strengthens women, gives them a strong position and it describes women as fighters, a feminists, a phenomenons who are more concern about what they can do than how they look and they are unafraid to get their hands dirty. Many brands are using this trend including traditionally feminine industries like beauty, fashion and personal hygene. Singers like Beyonce are being influenced by this trend we can see it in her video Hold Up. Athletic stars like Serena Williams are being used much more for advertising spots and campaigns etc, thanks to this trend. I am really interested in this trend and think I will work on it by reasearching and exploring much more in depth.
5) GLOBAL NEIGHBOURHOOD

Despite the controversy around borders and building walls from a country to another the global information is unstoppable. Today everyone has instantaneous access to document and shares stories and ideas in every part of the world, this increases people cultural curiosity. This trend shows how we are all becoming internationally connected. The circulation of this information around the world is having an effect on society and pushing people to change the way they see themselves. Mark Zuckeberg states: “The more we connect, the better it gets”. He is planning to open up the web to the two-thirds of the world’s population which is not yet online. I personally think this trend is very interesting and exciting as we are able to see different things from other parts of the world and we can be inspired by people from everywhere. If you want to know more about a different culture you don’t necessarily have to fly all the way to the place because someone there is already documenting and sending you the information for free. I will explore and reasearch more about this trend as in few weeks I will travel to Africa and see if I can document any intersting visuals I see over there, which I could then share with my mates over here. Global neighborhood is about embracing this state of flux and our collective cultural identities will be less about where we are and more about what we believe based on our connections.
6) NEW NAIVETY

With all the serious issues that have been going on in the world this trend, New Naivety is about authenticity and real life visuals. Thanks to socials like Instagram, snapchat etc, people have started finding the spontaneus, unfiltered way of showing themselves, very attractive. It is the result of how the younger generations has been expressing themselves in unpredictable ways via social media. Brands are loving this trend as it’s real and raw and it displays traits we once tried to hide like freckled or chubby and is full of personality, humour and individuality. The trend is about imagery that isn’t on brand and makes people laugh. I really love this type of imagery because it makes social media fun and you can always find that one image that will make you laugh hard.
As soon as we were introduced to the Visual Trends assignments I was interested in the Gritty woman, Colour Surge and Global Neighborhood but I was not sure of which one I wanted to focus on. After a week of listening to my classmates and looking at the trends slightly more in-depth. I thought Gritty Woman was the right trend to work on. To expand my ideas on the subject I created a mind map that would help me portray ideas and visions I had in mind.

QUOTES . . .
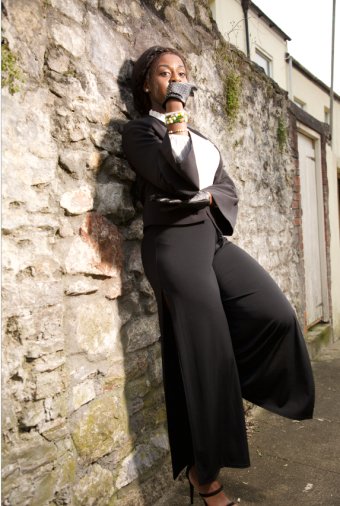
By collecting the words I included in the mindmap and by reading those two quotes I had a visual idea on how I a “Gritty woman” should look like in my opinion.
My idea of gritty woman wasn’t a sweaty woman with dirty nails but a strong elegant powerful woman.
 VS
VS
STRONG POWERFUL WOMEN


MOODBOARD/IDEAS
Thanks to the mind maps and a bit of research I’ve done I have a better understanding of what I am planning to do. I will create a series of women elegantly dressed on location and studio. Will make sure that the images will send across the message of women looking strong powerful and gritty. Will try portray this through poses, props, angles, facial expressions etc. I will look at the work of these two photographers Renam Christofoletti and Mikael Jansson. I will try to get as much inspiration as possible not only from photographers but through media etc.
INSPIRATION
SONGS
MOVIES


CELEBS/BOOKS/ARTICLES/MAGAZINES
Mikael Jansson
( http://www.mikaeljansson.com )

He is fashion photographer/director currently living in London and working worldwide. He became known in the mid 90s for creating some work for some of the leading avant-garde publications of the era. His mainly influenced by the legendary Richard Avedon who he worked with in the late eighties. He has worked for publications such as Vogue, Vogue Paris and Vogue Nippon. He regularly contributes to Interview Magazine, shooting celebrity cover features and influential actors, musicians and designers. He has also created memorable campaigns for Calvin Klein, Armani Cosmetics, Hugo Boss, H&M, Salvatore Ferragamo etc. He has published several books, done exhibitions and won many awards.
HIS WORK
Writer Claes Britton said that the threads that tie Jansson’s work together are the women he portrays, paradoxically strong and vulnerable. I really like the photos he took of
Jodie Foster:


I really love these black and white shots of Jodie Foster, the style and the way she poses sends across a message of a powerful and gritty woman and this is how I want my shots to look like. He played with her look, how he posed her and the lighting in the photo to get this final results and that’s what I am going to do. I’ve already taken note of her clothes, hairstyle and makeup will try to recreate these photos in my own way.
Jennifer Lawrence


I absolutely love these two photos of Jennifer Lawrence, one of the ideas I have is inspired by these photos, although I am not planning to have them in black and white. Unlike the first photo, the lighting isn’t as dull, is bright but yet there’s still some grit in the image, probably because of her gaze, the angle of the camera and her outfit. These are all elements I will consider whilst shooting. I liked the way he has positioned the model between the table and the chair in this way nothing looks distractive, it looks smooth and everything is in place.
Solange


Just like the other photos I love these ones of Solange. They are less gritty than the other ones but because of how she is posing, her facial expression and her outfit it still makes her look like a “woman in power”. I will try to do a similar shoot in my own way. Another characteristic I like about the pictures is the tone of the pictures, they are not bright and the photographer used cool colours that really work with the background and the pictures look slightly desaturated. I really love this style he has used to shoot these photos as it is similar to my style.
Renam Christofoletti
( http://renamchristofoletti.com/en/works/editorial/ )

Renam Christofoletti is a Brazilian-born fashion photographer. He is recognized internationally and he has worked for high fashion magazines like Vogue, Elle, Gq, Harper’s Bazaar etc. He also does advertising, beauty campaigns and celebrity portraits.
HIS WORK


The three photos above are the ones that got my attention, I’m thinking to do a series of the shoot in studio and location in this style. I like how plain and simple these images are. The elements that stand out to me are the outfits, poses and facial expressions. Additionally, we can see in a picture the model is standing still but in the other ones there is movement and I think I will experiment by trying to add actions to my images.
PLANNING:
Date & Time: 27/10/2017 @ 8:00 – 13:00
Location: Behind prospect street
ASSISTANT: Laura
MAKEUP by me:


STYLIST & CCLOTHES:
Equipment: Reflector, light meter, Quadra Ranger Rx Kit, Camera – Canon 5D Mark III (24-105mm lens), Skyport, Softbox.
Itinerary :
8:00 : meet at mine start with model’s makeup and hairstyle
9:00 : ready to move to the location
9:30 : lighting set up should be done ready to shoot
11:30 : Break and images review
11:50 : Continue with the shoot
12:50 : start packing up
13:00 : end of shoot
LIGHTING SETUP

this will be my setup, I must have an assistant for this shoot as I will need help with someone holding the light.

this is the kind of lighting I will aim to have in my photos.

Testing the lights . . .

As soon as I started I noticed how blue my photos were coming out and I corrected the white balance. After changing the white balance I was able to have this as a result:

I then noticed some parts of the image were over exposed, so I had to turn the light down and change the apreture until I got the light I wanted. I was shooting on between F.2 and F.4, shutter speed 1/125. ISO 100.
The photos below show how much the lighting was changing just by moving the light in different angles or closer to the subject.


CONTACT SHEET (printed)
BEST FINALS


FINAL

POST-PRODUCTION
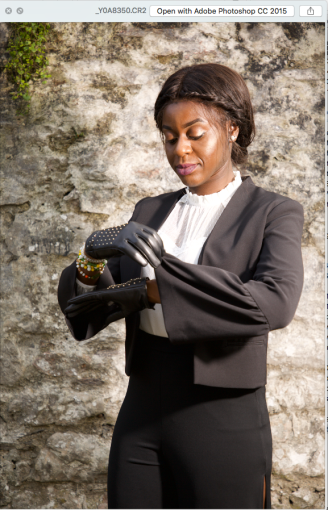
First step was to open my image on Raw Converter, Adjust the white balance, and correct the over exposed parts which are highlited in red.

 I did that by decreasing the highlights, whites and exposure, I decreased the blacks and added a bit of shadows. I then added a little bit of contrast. I then used the spot healing tool ( J ) to get rid of any spots on my models face and I used the stamp tool (S) to get rid of any distracting elements in the background. After I duplicated the layer (CMND J) and worked on the top one.
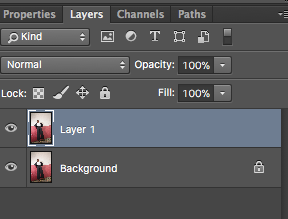
I then desaturated the top layer and made it black and white (CMND U) and changed the blending option to overlay.


I decreased the opacity of the top layer to about 86% and created a layer mask and started brushing (using brush B ) the areas which were too dark and were loosing detail.


At this point I emerged the layers (CMND E). I was not sure whether to leave it in colour or black and white but I then decided to have it in black and white because the red colour in the background was slightly pushing the whole image out of theme.


I was going to leave it like this until Rebecca Swift and my tutor suggested I should adjust the lines and make the picture look straighter. So I simply opened it back on Photoshop duplicated the layer, free transformed the top layer (CMND T), and tilted it untill it looked straight enough. I then used the stamp tool to cover the corner where you could see bits from the layer below.
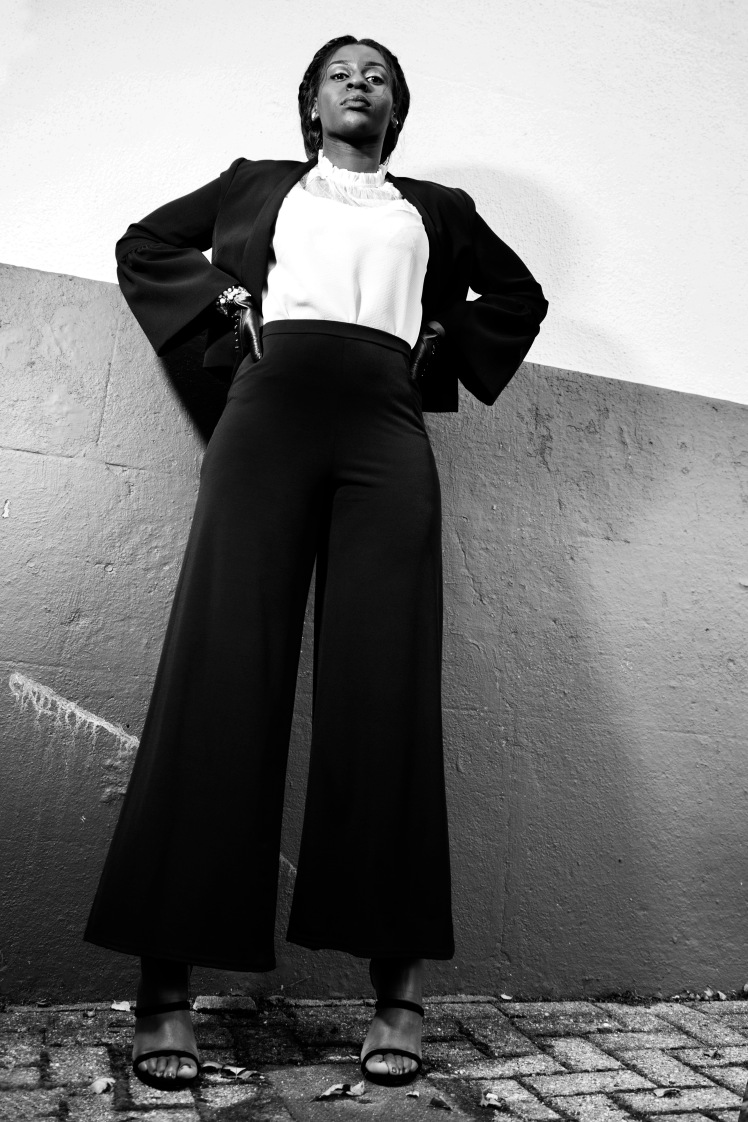
This is the end result:
EVALUATION
This is my first shoot and I think it went well, although we did not exactly follow the same timetable which I planned for the day. We started shooting later than the scheduled time, because makeup and styling took more time than planned, yet we still had plenty of time to shoot. I was panicking a little bit at the beginning as I thought I wouldn’t have had time enough to finish the shoot because we had to be done by 13. Luckily I was able to take many shots in different locations we just had to give up the break I schedule, we only took a short break to review the images and check if I was doing something wrong or if there was something I could have improved. Also I had a little problem with the person who was supposed to assist me as she couldn’t make it on the day, but lucky enough my mum came down to visit that week and she gladly accepted to assist me by holding the lights and supporting me in every way she could. I initially had few problems in styling and posing the model but with time she got comfortable and it was easier to direct her. I picked this image as my final because I think is the image that portrays my view of a gritty woman. I used her gaze, posture and camera angles to rappresent power and grittiness. Initially when I was editing the photo I wanted to leave it in colour but decrease the saturation to about 25-30% to have the colours looking very dull, but the red in the background was really strong and it was killing the mood of the photo and it was pushing it out of theme, so I turned it completely in black and white and I prefered it like that.
Overall, I’m happy with the final result and this shooting has made me much confident in using the equipment and shooting on location by balancing flashlight with ambient light.
PLANNING:
Date & Time: 3/11/2017 @ 8:00 – 13:00
Location: Royal William Yard
ASSISTANT: Laura
MAKEUP:

STYLE&OUTFITS

Equipment: Reflector, light meter, Quadra Ranger Rx Kit, Camera – Canon 5D Mark III (24-105mm lens), Skyport, Softbox.
Itinerary :
We planned the model would do the makeup herself.
9 :00 : meeting my assistant and get the equipment
9:30: meet in town and get to Royal William Yard (arranged a taxi that would leave by 9.40)
10:00 : lighting set up should be done ready to shoot
11:45: images review/short break
12:00 : Continue with the shoot
12:50 : start packing up
13:00 : end of shoot.
LIGHTING SETUP

Testing lights
When I started the lighting was too bright and it was creating very strong shadows, so I pulled the lights away from the subject and I also moved slightly backwards but it became too dark. To correct it I noticed I had to pull the subject away from the background and also change the aperture. In the first photo I was shooting on F.2.8 and it was too bright so I was letting too much light in and in the second image I was on F.5.6 and it was slightly too dark so I changed it to F.4 in the third image and I got the right exposure.
I also tried repositioning the lights to see if it would give any different feel to the images.


CONTACT SHEET (printed)
BEST FINALS


FINAL
Initially, I did not know which one to have as my final between these two:


I then decided to chose this one:

Because I think the composition and lighting are stronger on this image.
POST-PRODUCTION
First step was to open my image on Raw Converter, Adjust the white balance, exposure, contrast and decrease blacks and shadows. 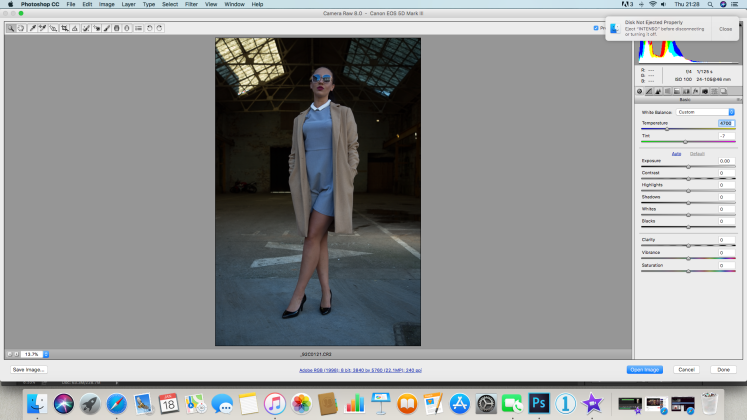
 I then used the spot healing tool (J) to get rid of any spots around her legs and face. I could have used a skin smoothing technique but because there is not much of her face and skin showing I could simply use spot healing tool.

After I duplicated the layers (CMN J) and changed the blending mode of the top layer to Overlay which added a lot of contrast to the image, to decrease the contrast and add a dinamic tone to the photo I then turned the top layer into black and white.


I the used levels (CMND L) to make the image less dark and decreade the saturation again to about -42.


I then used layer mask to brush the areas which were too dark or too bright and blend them with the original image.
END RESULT:
EVALUATION
This shoot went really well, the model was very good and confident which made directing her so easy for me. It was well organised, we followed the schedule and we were on time with everything: makeup and styling were all done in a short time and we got to the Royal William Yard at the right time. Weather was a potential issue for the day as it was meant to rain at some point during that day but fortunately it did not, it was just very windy and cold, so we had to take loads of breaks in between and had loads of hot drinks to warm up my model and assistant, due to that we concluded the shoot slightly earlier. However, we were able to shoot in different locations.
Overall, I cans say this was a successfull shoot, the end results came out just as I was expecting them, although looking through the photos unlike the first shoot this ones look very fashiony and less gritty but I’m happy with them.
PlANNING:
Date&Time: 10/11/2017 @ 9:00 – 11:30
Location: Studio
Makeup:
Natural/red lipstick


Style/Outfit
Idea 1:
Idea 2: (Indian wear)
I was looking through the Getty images website when I found some strong photos about Islamic Feminism. So I thought I could do a series in the studio based on that, not necessarily on Islam but strong Asian women, as I really love their traditional outfit.

Lucky enough I found an Indian girl who was happy to pose for me and she brought this amazing traditional dresses along, so the idea was to put her in normal formal clothes and then into the traditional dress in strong poses just as is shown in the slideshow above.
Equipment: Small/Product studio (light bodies, softboxes and dishes) light meter, Camera – Canon 5D Mark III, Skyport, poly boards, honeycomb.
Itinerary :
9 :00 : Get to the Erc get all the equipment needed.
9:30: Finish setting up lights/ model arrives
9.45 : Start shooting.
11:20: Start packing up.
11:25: End of shoot.
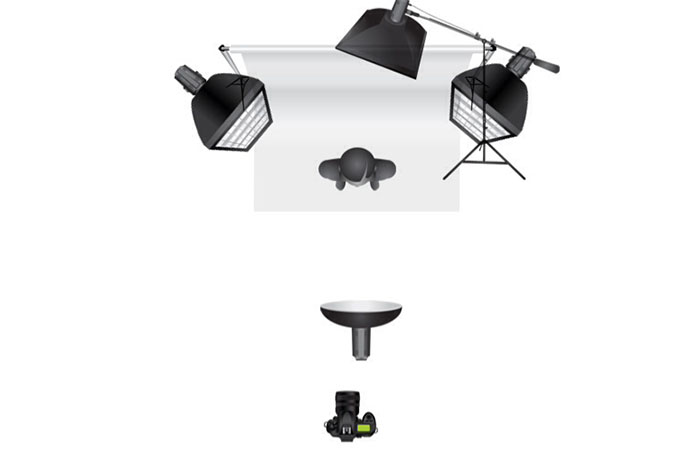
LIGHTING SETUP:
I looked at different lighting setups I could use in studio and then I decided I will use a square soft box as my main light and add a snoot at the back.


TESTING THE LIGHTS
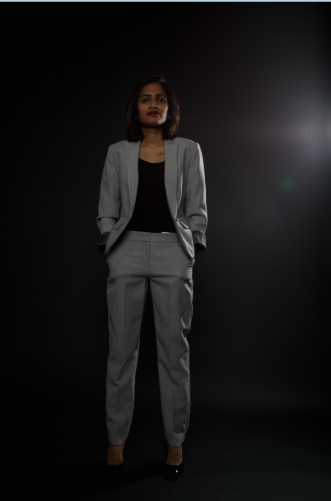
I started by only using 1 softbox in front of my subject and a poly board the light at the back wasn’t in use at the starting point. As we see in the picture it was way too bright and the photo came out overexposed.

Then I manage to get the correct exposure by setting up the right iso, aperture, shutter speed and the right power on the lights.

Once the main light was already setup I turned it back off and turned the backlight on. I wanted to create a highlight on her side and on her hair.

And by turning the Key light back on this is the lighting I achieved.

CONTACT SHEET (Printed)
BEST FINALS


FINAL

POST-PRODUCTION
At this point of the year, we were introduced to new software Capture 1, which is similar to Lightroom. This made me change how I process my images, usually I would select the ones I want to use and adjust the lighting elements on Raw Converter, but Capture 1 has been much quicker, helps to categorize your images quicker and easy to use, I’m glad they showed us this software. So firstly I exported the images in Capture 1 and adjusted the esposure, lighting tone and blacks.
SCREENSHOT CAPTURE 1
I then opened the image on Photoshop and started by working on the background. I had to take out the light showing in the background, the bit outside the backdrop and the green flare probably caused by the camera lense. I did that by using the marquee Tool (M) to select the section I wanted to delete and dragged it all the way out by free transofming it (CMND T). For the flare I used the Stamp Tool (S). 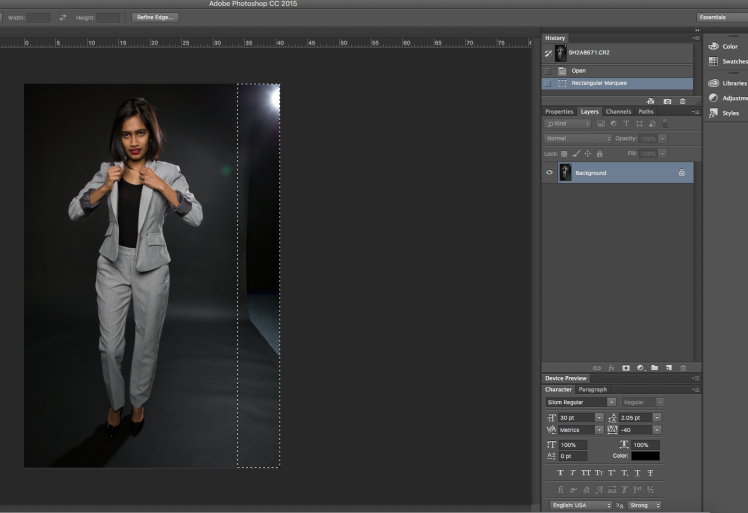

After, I duplicated the layer (CMND J), made the top layer Black and white (CMND U) and then changed it blending option to Overlay. This made it overly dark and with a lot of contrast, so I had to lower the opacity down to about 50%. Sequently I created a layer mask on the top layer and started brushing out the bits that were too dark like on the feet and heels.


I then merged all the layers together (CMND SHIFT E) to get only one layer,
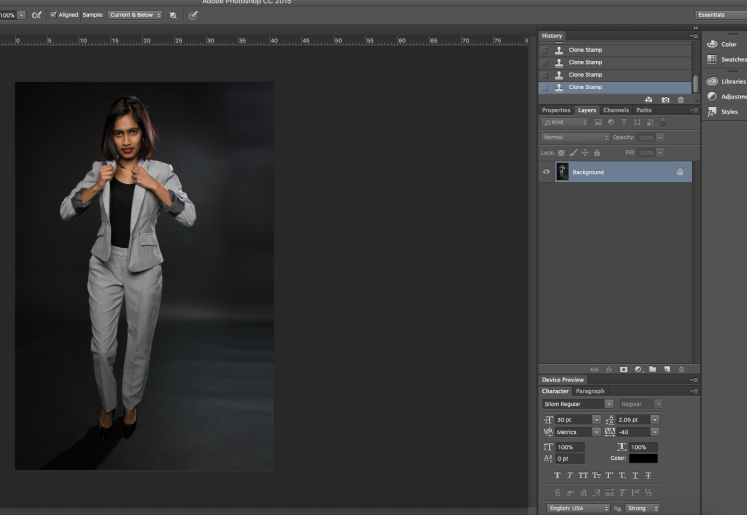
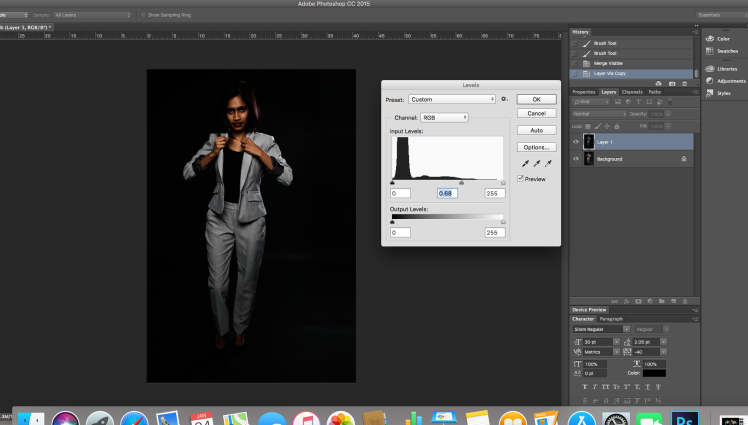
then I duplicated the layer again (CMND J) and decreased the level (CMND L) to 0.68 to make the background darker and cover up the white highlights you can see on it.
 However, by decreasing the level the subject became darker as well so I created a layer mask again and brushed the subject out to keep her normal tone. I then emerged all the layers again and the decreased the saturation to about -31. I then used the stamp tool to get rid of any white highlights or distractions in the background.


EVALUATION:
This was my third shoot so far and I’m happy with the final results although I had few issues on the day of the shoot. Firstly unlike my other shoots on location, for this one I had less time since it was in the studio. The plan was to get there at 9 start setting up the lights and be ready by 9.30 which was the time when my model arrived and do her makeup etc and start shooting by 9.45. Unfortunetly, as I got to the studio at 9 the black background I requested wasn’t on, so they had to do it on the same morning, which took about half an hour to fix it on as they couldn’t find a full blackdrop. Fortunetly, my model was a little bit late, so I had the chance to quickly set up the lights but because it was only me and the model I had to position the lights before as I couldn’t really try until she got there. So after she dressed and the makeup was done I placed a chair so she could sit down and I get the right lighting.
By the time we start shooting it was about 10.30 and we had to be done by 11.30. Even when we start shooting I encountered few problems and I forgot to get myself a honeycomb so I had to go and see the erc but for some reason they were closed untill 11.45 and I had to finish the shoot by half 11. So I just used what I had. All these little inconvinience made me run out of time so we could only do one outfit and I could not do my other idea which was based on the typical asian wear. Was really unfortunate we could not do that shoot as I think I could have come out with many strong interesting images. This so far is the only shoot I’ve done in studio this year and I noticed I’m now confident enough when working in studio but it has also confirmed what I stated at the beginning of this year which is that I prefer shooting on location than studio. Overall, I’m happy with the final image, I think it came out just as expected, I couldn’t complete my second idea but I’m hoping I can do it later on. I do not think I will do the rest of my shoots in studio, which makes this my only images that have been shot in studio.
PLANNING:
Date & Time: 6 January 1017
Location: Ghana (Africa), my garden.
CLOTHES/STYLE:


EQUIPMENT:
camera (Canon 600D, standard lens and 50 ml), Flashgun, reflector.
ITINERARY
Unlike the other shoots, I did not really plan a day for it as I just decided a day when I was less busy and then I would organise myself, look for ideas and shoot.
I also did not use lights like the Quadra kit for the other shoots, so I did not think about any lighting diagrams.
TESTING THE LIGHTS
I had a big problem with using the flashlight as the batteries I bought for it was not compatible so, unfortunately, I had to shoot without it with ambient light and a reflector. The pictures were turning out either too warm or too bright. So I checked whether the ISO was completely low and I made sure my aperture wasn’t too wide. I tried adjusting the white balance but it wasn’t really working right, so my only option was to leave it as it was and then correct it in post-production.


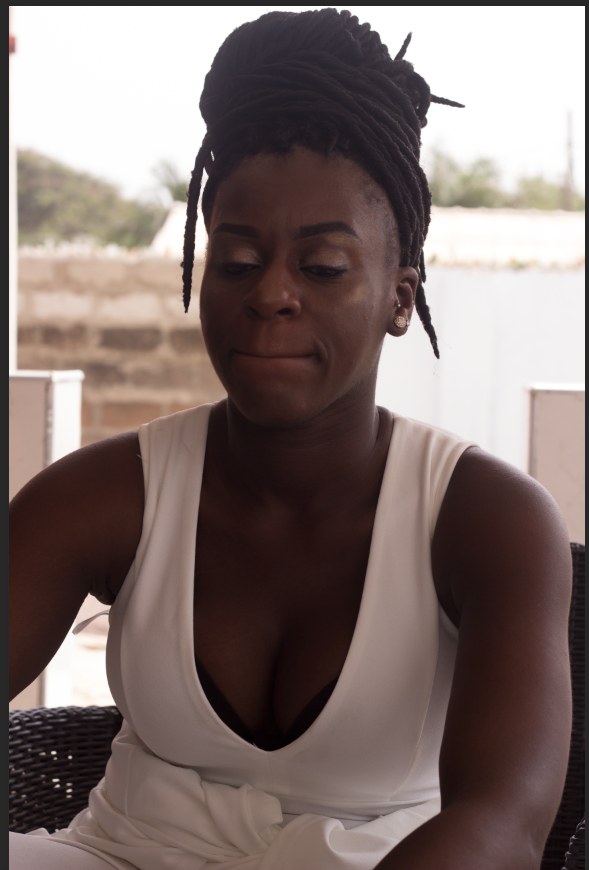

BEST FINALS
FINAL

SHOOT 5
PLANNING:
Date & Time: 6 January 1017
Location: Ghana (Africa), my garden.
CLOTHES/STYLE:


EQUIPMENT:
camera (Canon 600D, standard lens and 50 ml), Flashgun, reflector.
BEST FINALS
FINAL

EVALUATION
These two shoots were planned last-minute, not knowing I had to travel to Africa I had a complete different idea which I wanted to take in a location in Plymouth, due to timing and organisation I had to adapt the ideas I had to this ones. I was also planning to use the Quadra kit just like I used in my other shoots but because I was travelling far away and for a long time I couldn’t book this equipment out. However, I am happy with the end results, it wasn’t quite the expectation I had but I think, these images are successful. I saw many interesting locations which I could have used but it wasn’t too safe for my sister and I to go there so I simply decided to shoot in my house. It was really challenging to do this shoot, not only because I did not have the equipment but also because it was the first time I was shooting in such a hot with almost 38 degrees and it was so bright. I did a big mistake which I have learnt from, I did not to try the batteries in the flash-gun before travelling, I got there and realised I got the wrong batteries, so I bought other ones but they did not work, so I decided to shoot without flash gun just with the sun light and a reflector, which I did not use as much.
Finding the right clothing was also challenging as mostly all my ideas were including autunm/winter formal wear, but with the heat and the brightness I could not have have my model wearing such clothes as it would have also looked out of place.
PLANNING:
Date & Time: 21/01/2018 @ 16:00 – 18:00
Location: Birmingham, The Collection Hotel
Ideas/Style:


FINAL BEST ONES
FINAL

Evaluation
This was my last shoot and it took me longer time to plan. I booked a room in a hotel in Birmingham back in November to get a cheaper price. I had an idea of how I wanted the setting and I saw what I wanted. unfortunately I was not able to shoot in the room which I booked for some inconvenience. Overall, I really enjoyed this shoot. The final images came out just as I was visualising it at the beginning. I thought about the outfit and styling thoroughly and this helped me get a final outcome. The day was well organised, although I wanted to shoot outdoor as well, but it was heavily raining in Birmingham that Sunday so I decided to stay indoor. This shoot confirmed the fact that I prefer shooting on location even more. I am really impressed on how I was able to be organised from my first shoot to this shoot which was my last. Additionally, I’m very happy it went well as I planned it. I this shoot on mind long time ago and because of the amount of preparation and research I put into this shoot I would have been very disappointed if it was to go wrong.
FINAL EVALUATION
For this module we were asked to choose a visual trend to work on and I chose Gritty woman. I decided to make a series of fashion environmental portraits of women looking powerful, strong and elegant because that’s how I portray a Gritty woman to look like. I have really enjoyed shooting these photos, I’ve challenged myself and just as planned at the beginning of the year I tried to focus in shooting on location with flashlight. I started having a strong interest in shooting on location after last years’ workshops using the Quadra kit and also from the experience we had when we went to Pentillie Castle. I just loved how the pictures looked and realised that I enjoyed shooting more on location than studio. I really wasn’t confident with balancing ambient light and flashlight last year, that’s why I really challenged myself this year by shooting a lot with the Quadra Kit. My first shoot was the one which I enjoyed most, everything went as I planned and organised, which I was very happy about as organising and time management are one of my weaknesses, so I was really pleased with that, additionally, my assistant could not make it on the day everything but lucky my mum came down to visit that week and she happily helped by holding the lights, it was really funny and it was good to show my mum exactly what I am working on and what I enjoy doing. My second shoot went well too, despite the cold weather everything else worked out well. This shoot really made me realise that weather can be a big issue when shooting outdoor, it was supposed to rain that day and that was the only day my model and I had off so we had to shoot on that day no matter what. Luckily it did not rain but it was extremely cold, my model was freezing and I had frozen hands to the extent I couldn’t press the buttons on the camera. However, we were able to get lots of different strong shots in different areas of Royal William Yard. For my third shoot I decided to do it in studio, reason is because all of my shoots were based on location but not to forget the skills I have learnt in the studio I had to do at least one studio based-shoot. I planned everything but it did not go as planned and I have to admit it was the shoot I enjoyed less, reason is I had few problems with the Erc, I already did not have enough time in the studio, I requested for a black backdrop days before but when I got to the studio in the morning the backdrop wasn’t up and it took them about half an hour to come and change it, and this slowed me down. During the shoot I realised I forgot an essential equipment as I went to get it the ERC was closed for some reason so I had to use what I had. Because of the inconvenient and the short time I had I was only able to do one outfit and I couldn’t do my second idea which was based on Asian traditional clothes, I think I would have got some great images from that shoot. I tried to rearrange the shoot but between work and the few weeks I had left before traveling to Ghana we couldn’t make it. For shoot 4 nd 5 I had a completely different idea which I then adapted to the circumstances I had. The original idea was to shoot in a place full of graffiti near Union street, which I found on my way to work, and to have my model standing out by wearing very strong and elegant clothing. However, because I had to travel I organised two shoots using my garden in Ghana, there were many wonderful places I could have used but because of security reasons we could not do the shoots there. My last shoot is the shoot which took me longer time to plan. I booked a room in a hotel in Birmingham back in November to get a cheaper price. I had an idea of how I wanted the setting of the room to look like and I saw what I wanted.

This was the exact setting I was looking for, the colours red, black and white were just perfect. unfortunately, when I got there they gave me the wrong room which I did not pay for but time was running fast so I had to use it as it was, at the end of the shoot I complained that the room was too cold and they moved it the room above, which was the one which I initially requested and paid for. I was very annoyed by it because that was the room I was supposed to use for the shoot. However, the final images came out well, although I think they would have looked much better in this room. Overall, I am very happy with the final results, I have really improved my technical skills and confidence in posing people. I’ve learnt how to plan and organise a succesful shoot and manage my time well.


Statement of intent
For the second part of visual trends we’ve been asked to create a photo essay based on one of the six trends. It either has to be a 6-9 Image photo story, A moving image piece (minimum 3 minutes) or an interactive PDF created with InDesign, with images and a moving image piece. We then have to write 1000 to 1200 word essay about the subject we will pick. Initially, I wanted to continue with the Gritty Woman Trend and create a photostory about it but I really had no idea about what exactly to focus on with that trend . So I thought about Global Neighbourhood, knowing I was going to travel soon I could have documented the different stories and situations I see over there. I am not too sure of the final outcome of the idea I’ve got. I either want to narrate how Ghana has extremely poor areas as well as very developed rich areas, and this would show how inequality in the country. Or I don’t whether to just say a story about the place and the people there.


http://www.bbc.co.uk/news/world-africa-42396950
Photos I took:


FINAL ARTICLE PDF
